Say Hello!

You can Contact Us here, and we will try to get back to you (someday, hopefully…) soon!

< Back


123 Street Avenue, City Town, 99999

(123) 555-6789

email@address.com


You can set your address, phone number, email and site description in the settings tab.
Link to read me page with more information.

RECIPES

Filtering by Category: Recipes

Walnut Nori Rolls

Mary Taylor

Nori rolls are a great addition to summer picnics. These, made with a flavorful walnut paste, are delicious served plain, but are also excellent with a Tamari dipping sauce spiced with a dab of wasabi paste and some pickled ginger on the side. They are best eaten within a few hours of assembling as the nori wrapper becomes soft and chewy over time. Though some people I know like that part the best! This recipe was inspired by the amazing Walnut Nori Rolls at my favorite restaurant in Vancouver, BC—Eternal Abundance Café.

yield: 8 rolls  |  prep time: 15 minutes | assembly time: 35 minutes | resting time: 2 hours (optional)


ingredients

Walnut Paste:

  • ½ cup walnuts

  • ¼ cup pecans

  • 3 tablespoons sesame seeds

  • 3 tablespoons sunflower seeds

  • ½ cup diced red bell pepper

  • 1 stalk celery, diced

  • 1 small carrot, diced

  • 2 tablespoons nutritional yeast

  • 1 ½ tablespoons mellow white miso

  • 1/2 teaspoon smoked paprika

  • ¼ cup parsley or mint

Roll Fillings:

  • 8 nori sheets

  • 1 cup mixed sliced raw vegetables

  • (carrots, peppers, cucumber, avocado, etc.)

  • Sprouts, such as alfalfa or broccoli


directions

  1. For the Walnut Paste: In a medium bowl combine the walnuts, pecans, sesame seeds, and sunflower seeds. Cover with filtered water and allow to soak at room temperature for about 2 hours to soften. Drain thoroughly. This step is optional but gives a smoother texture to the paste.

  2. Transfer the nuts to a food processor and add the bell pepper, celery, carrot, nutritional yeast, miso, paprika and fresh herb. Blend thoroughly until the mixture becomes an even paste. Transfer to a bowl or refrigerate for up to 5 days in an airtight container.

  3. Toast nori sheets before assembling. Hold each sheet separately about 4-5 inches away from the heat source of a stovetop burner, turning the sheet and toasting it evenly.

  4. To assemble, place a bamboo sushi mat on your work surface with the stitched lines vertical in relation to the front edge of your work surface.

    (In other words, so you can roll it from bottom to top when making the roll).

  5. Place a toasted nori sheet on the mat, shiny side down. Spread a thin layer of walnut past on the nori, covering the entire surface evenly, leaving a 1/4-inch strip at the top uncovered.

  6. Arrange slices of cucumber in a line across the roll about 1/4 up. Arrange other vegetables on either side and sprouts on top. Do not over fill.

  7. Using the mat, roll the nori around the filling, pulling tightly to make a neat roll with the far edge down when you finish rolling.

  8. Transfer to a cutting surface and cut into slices with a sharp knife. Store in an airtight container, or better yet serve immediately.


Miso Lemon Tofu with Spicy Cilantro Sauce

Mary Taylor

Lemon juice and zest give the tofu in this recipe a fresh lemony burst in flavor which is complimented by a touch of sweetness and a spicy cilantro sauce. The dish is simple to prepare, with steps that can be taken in advance or over the course of a couple of days if you only have 10 minutes to cook here and there. It’s excellent served piping hot or at room temperature as either an appetizer or main course.

yield: 6 servings  |  prep time: 20 minutes | cooking time: 15 minutes


ingredients

  • 1 pound firm or extra firm tofu

  • 1/4 cup mellow white miso

  • 1/4 cup fresh lemon juice

  • 1 heaping teaspoon lemon zest

  • 3 tablespoons maple syrup (split between tofu and sauce)

  • 1/4 cup olive oil (split between tofu and sauce)

  • Crushed red pepper flakes to taste

  • 2 cloves garlic

  • 1 bunch fresh cilantro, tough stems trimmed and discarded

  • 2-3 tablespoons water

  • Salt and pepper to taste

directions

  1. Slice the tofu into 1-inch slices. Arrange on a clean kitchen towel and cover with half the towel then place a weighted board on top so the tofu drains for at least 20 minutes.

  2. Combine the miso, lemon juice, lemon zest and 2 tablespoons maple syrup and a pinch of red pepper flakes in a medium mixing bowl.

  3. Add the drained tofu and toss to coat with marinade. May be prepared up to 24 hours in advance if refrigerated.

  4. In a blender, combine 3 tablespoons oil, garlic, cilantro, and water and remaining maple syrup. Blend.

  5. Season to taste with salt, pepper and pepper flakes. This sauce can be prepared up to 3 days in advance, stored, covered, in the refrigerator.

  6. When ready to cook, heat 1 tablespoon oil in a medium skillet until hot but not smoking. Add the tofu and cook, tossing often, until it is crispy and browned. Serve with sauce alongside.

Glazed Fennel and Shiitake Salad

Mary Taylor

 
Fennel Salad 3.jpg

This interesting combination of ingredients turns the everyday idea of salad into something quite memorable. The salad is wonderful served warm, which takes some last-minute preparation. If time is an issue, the dish may instead be served at room temperature cooking each vegetable up to a day in advance.

Yield: 4-6 Servings | Prep Time: 40 Minutes | Resting Time: 10 Minutes


ingredients:

  • 1 lemon

  • ¼ cup tahini

  • 2 ½ + 1 tablespoons maple syrup

  • 2 tablespoons low sodium tamari

  • ¼ cup olive oil + 1 tablespoons

  • 1 clove garlic, minced

  • ¼ teaspoon crushed dried red pepper (or to taste)

  • 2-3 tablespoons water

  • Salt and freshly ground pepper to taste

  • 4 fennel bulbs

  • 1 tablespoon fennel seeds, crushed

  • ¼ pound shiitake mushrooms

  • 1 cup snow peas

  • 4 cups mixed greens, cleaned

  • ½ cup toasted walnuts

  • ¼ cup currents

directions:

  1. To prepare the dressing: zest and juice the lemon, setting each aside separately. In a small mixing bowl whisk together the tahini, 2 tablespoons lemon juice, 2½ tablespoons maple syrup, tamari, 1 tablespoon olive oil, a pinch of the lemon zest, the garlic, salt, pepper and crushed pepper to taste. Stir until the salad dressing has a smooth, creamy texture, adding enough water to thin to desired texture. Taste and adjust the seasonings. The dressing may be prepared up to a week in advance if stored in an airtight container in the refrigerator.

  2. Trim the tops, stem ends and any tough outer layers from the fennel. Cut each bulb lengthwise into ¼ inch thick slices. In a large skillet heat 2 tablespoons oil over medium high heat until hot, but not smoking. Add the crushed fennel slices in a single layer and cook until golden brown then flip each slice over. Lower the heat slightly and continue to cook, adding the crushed fennel, a sprinkling of salt and pepper and 1 tablespoon of the maple syrup—drizzling the syrup between the slices and sliding the slices over the syrup to coat the bottom surface of each slice. After about 3 to 5 minutes the fennel should be just tender and the original cooked side will have begun to caramelize. Remove from heat.

  3. Meanwhile, trim and discard any tough stems from the shiitake. Rinse the mushroom caps, then pat dry and slice into thin strips. In a small skillet, heat 1 tablespoon oil over medium high flame. Add the sliced mushrooms and toss, then reduce heat slightly. Add 1 tablespoon lemon juice and season with salt and pepper. Continue to cook, tossing often, until tender, about 8 minutes.

  4. Trim and discard the strings from the snow peas, then stack the peas and slice lengthwise into thin shreds. Steam the shredded snow peas over rapidly boiling water for about 1 minute, until just tender. Drain immediately.

  5. Each of these vegetables may be prepared up to 24 hours in advance of serving. If prepared ahead, store separately in covered containers and bring to room temperature before completing preparation of the salad.

  6. Toss the greens, cooked mushrooms and snow peas, currents and walnuts together with a small amount of the salad dressing and place on individual or one large serving plate. Arrange the glazed fennel around the dish and serve with additional dressing along side.


Fig Scented Black Lentils

Mary Taylor

Black lentils are quick to cook and are lovely served warm or at room temperature with a gentle mix of seasonings to compliment their delicate flavor. Here fig scented balsamic vinegar reduction, high quality olive oil, tarragon and pine nuts combine perfectly to bring balance.

yield: 6 servings  |  prep time: 20 minutes | cooking time: 45 minutes


ingredients

  • 1 cup dried black lentils

  • 1 small red onion, diced

  • 1 tablespoon vegetable oil

  • 1 bay leaf

  • 3 tablespoons fig infused balsamic reduction

  • 2-3 tablespoons high quality olive oil

  • 1/4 cup minced fresh tarragon leaves

  • 1/2 apple, cored and diced

  • 1/4 cup diced red pepper

  • 1 clove garlic minced

  • Salt and pepper to taste

  • Sliced fresh tomatoes

  • Butter lettuce for garnish

  • 1/4 cup toasted pine nuts

directions

  1. Pick over the dried lentils to remove any rocks or debris. Rinse well and set aside.

  2. Heat the vegetable oil in a 1-quart saucepan until hot, but not smoking. Add the onions and toss to coat with oil, then reduce heat and continue to cook, stirring often, until soft.

  3. Add the lentils, bay leaf and enough water to cover by about an inch. Raise heat and simmer until tender but not mushy. If scum forms on top of the water, skim off and discard.

  4. Drain cooked lentils and transfer to a mixing bowl. While still warm stir in the vinegar, olive oil, tarragon, apple, red pepper, garlic, salt and pepper.

  5. Toss to mix and adjust seasonings. Serve on lettuce and garnish with tomato slices and pine nuts.

  6. Best served warm. Or store covered in the refrigerator and bring to room temperature before serving.

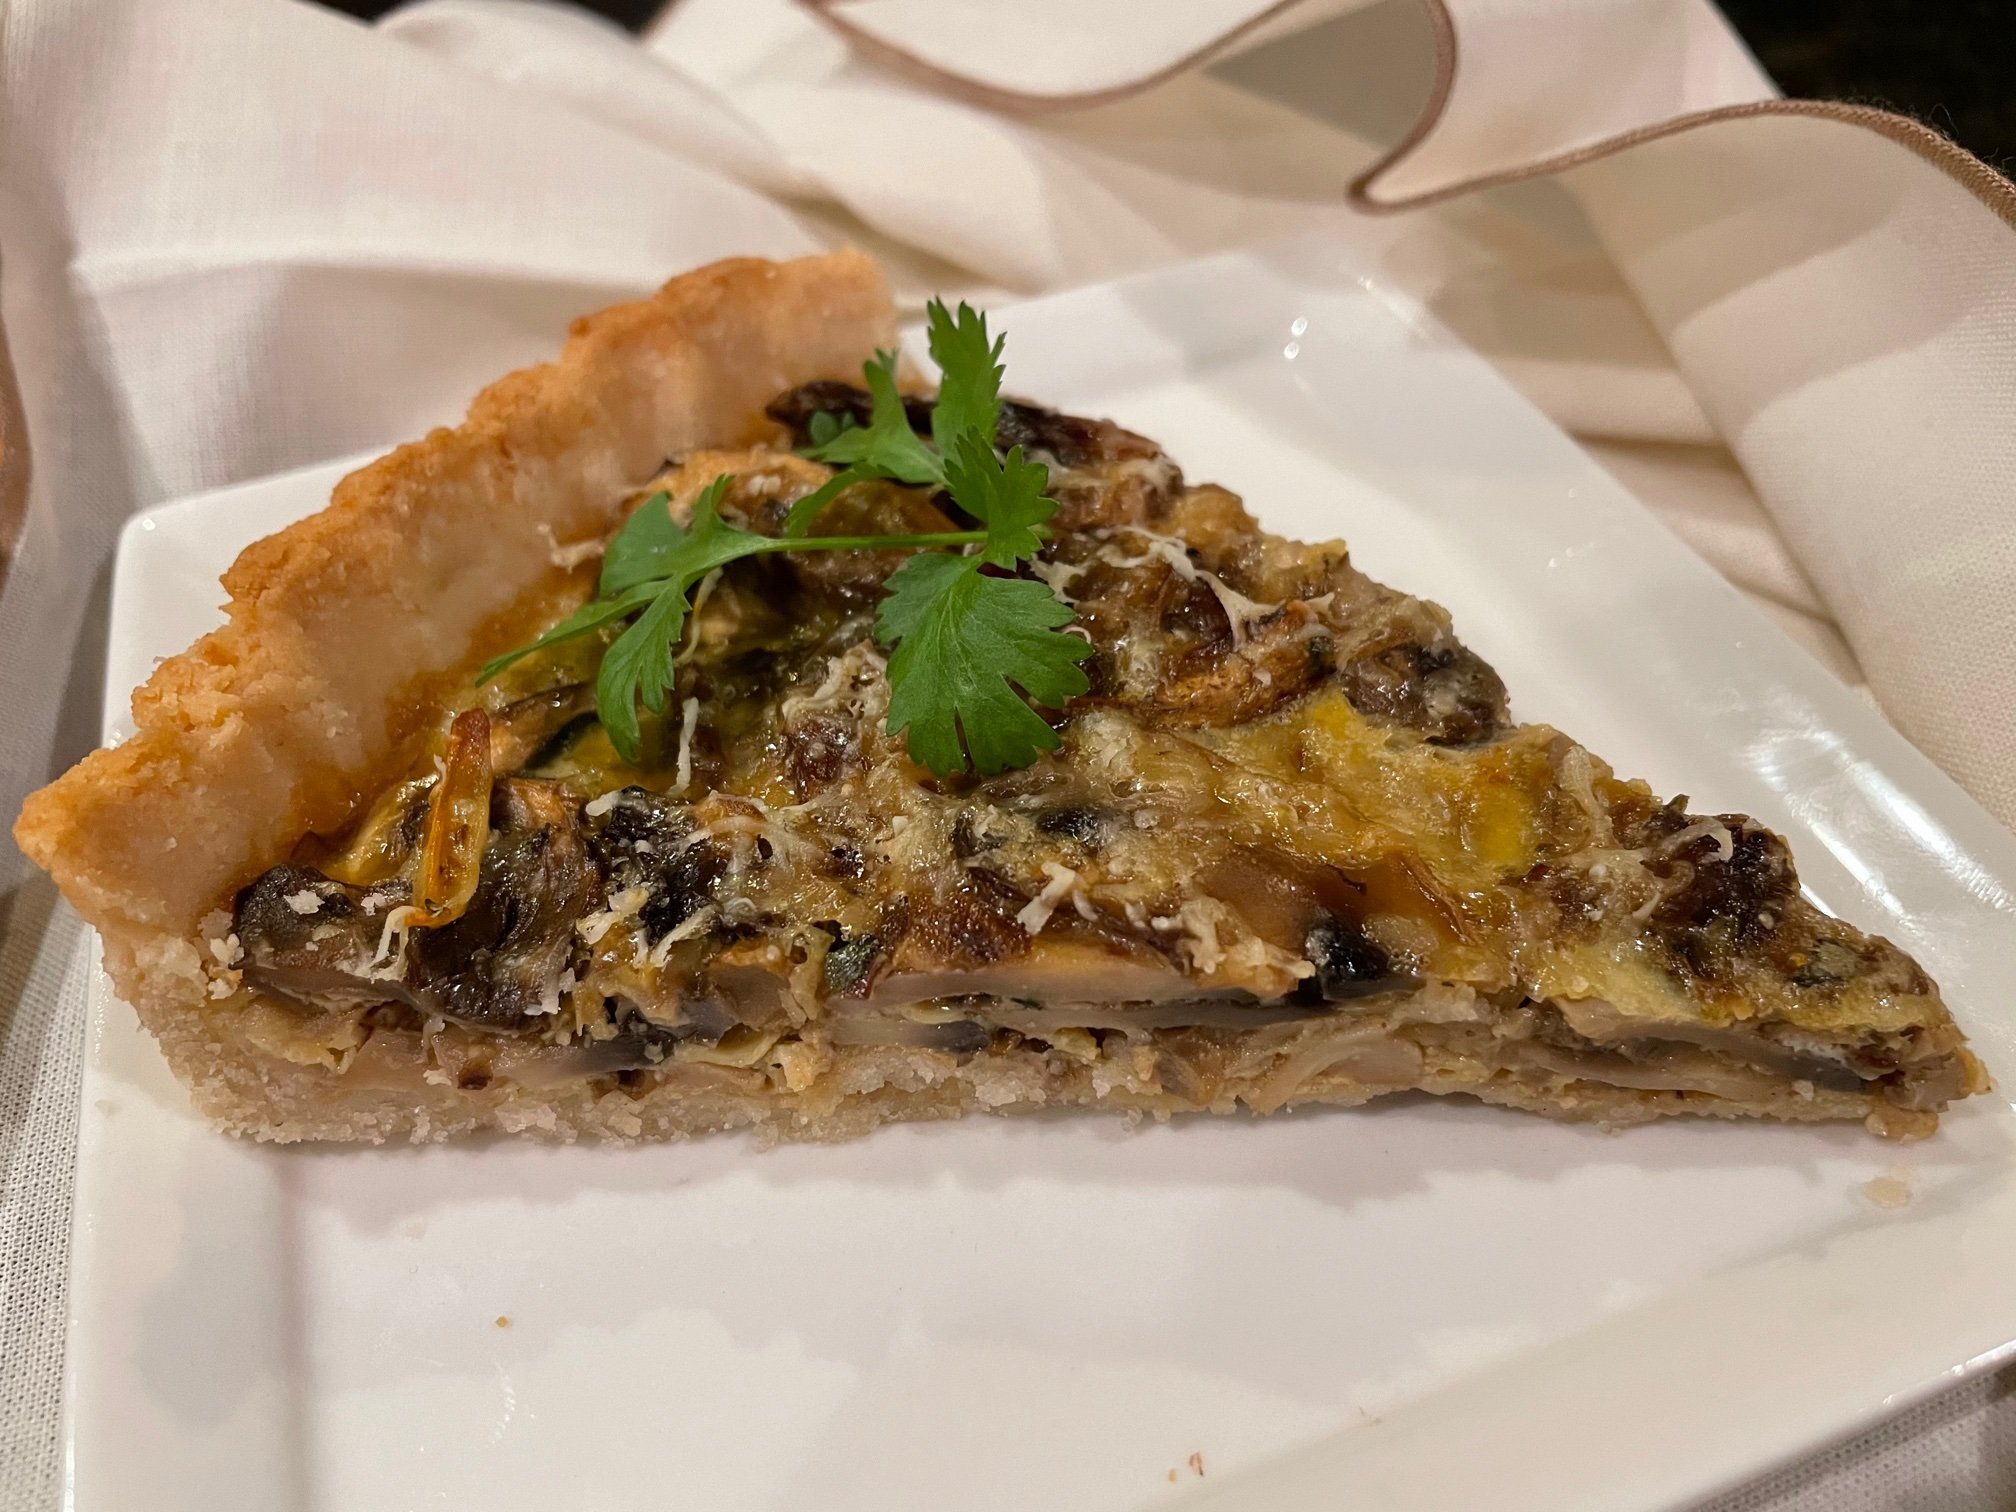
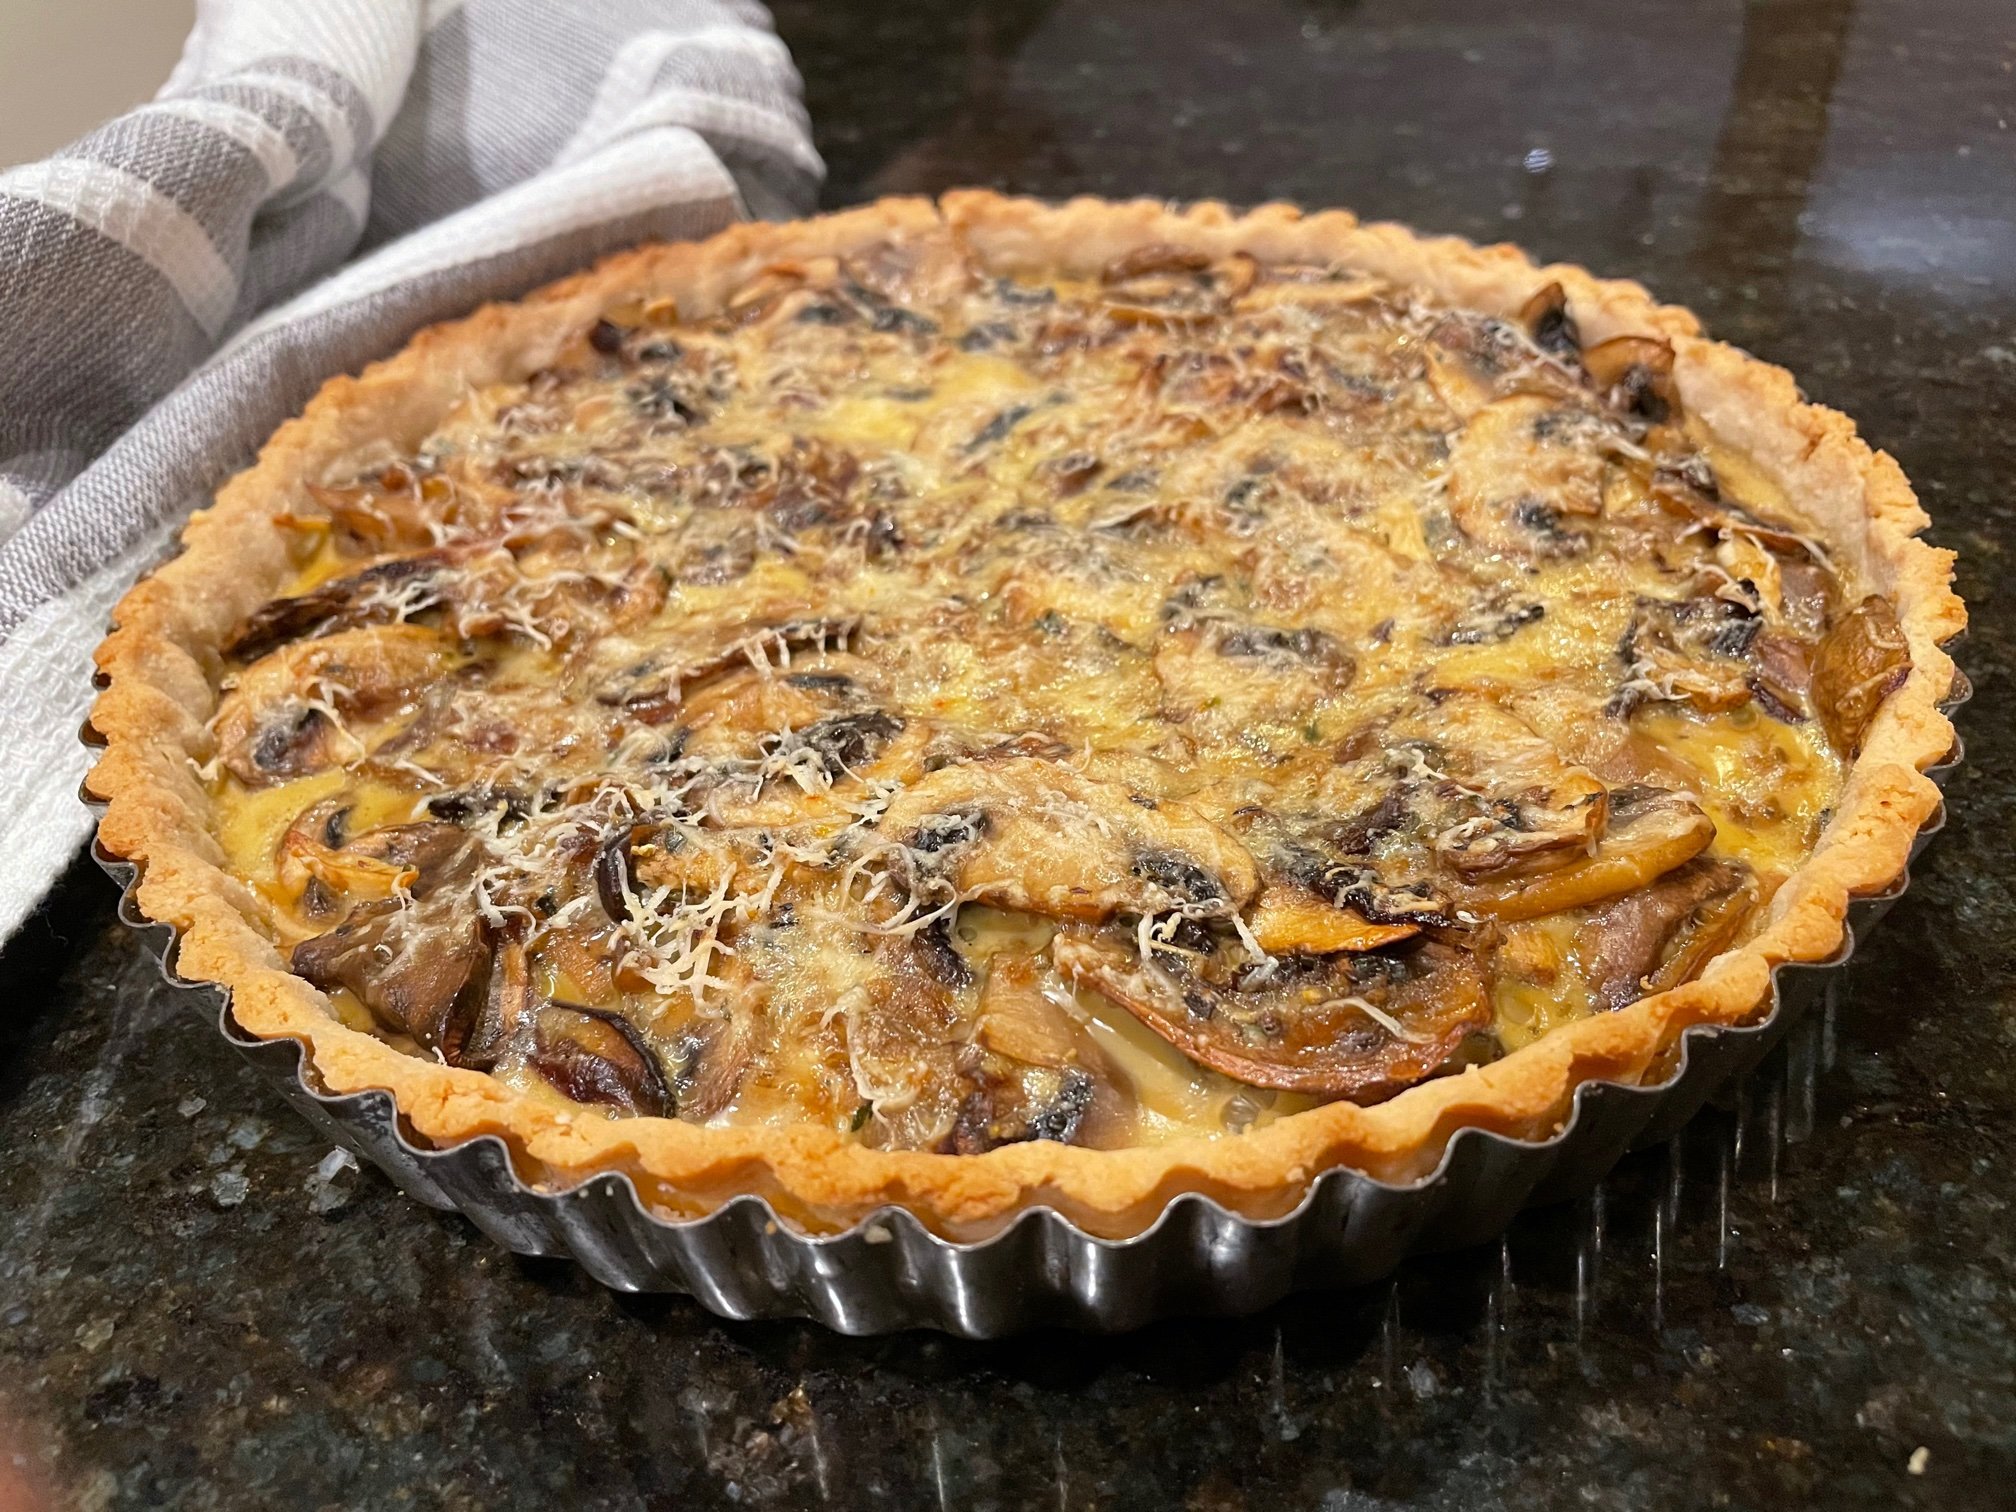
Gluten Free Wild Mushroom Tart

Mary Taylor

Gluten Free Vegan Wild Mushroom Tart

When I was at cooking school in France in 1972 (yes, I’m that old!), I first encountered wild mushrooms—morel and chanterelle were most memorable. I returned to the US and to my dismay not even button mushrooms were available at many supermarkets. Things have changed! Now, all sorts of exotic and wild mushrooms are readily available—even at mainstream grocery stores. This tart was inspired by a selection I got at our local farmer’s market. I used a vegan, gluten free dough (though full gluten, whole butter crust works great too) and if you want a completely vegan tart, you can substitute potato flour for the egg.

yield: 6-8 servings  |  prep time: 45 minutes


ingredients

  • GF pastry dough (below)

  • 1 1/4 pound fresh wild mushrooms

  • 1 1/2 tablespoons olive oil

  • 1 cup sliced shallots

  • 1 tablespoon lemon juice

  • 4 cloves garlic, peeled and sliced

  • Pinch of nutmeg

  • 1 1/2 teaspoon pink Himalayan salt

  • 1/4 teaspoon black pepper

  • 1/4 cup chopped chervil or parsley

  • 2 eggs, beaten with 1 tablespoon water (or use 2-3 tablespoons potato flour )

  • 1 tablespoon Grey Poupon mustard

  • 1/2 cup grated vegan or cow’s milk mozzarella cheese

    GF pastry dough

  • 1 cup GF flour mix

  • Extra flour for dusting

  • 1/2 teaspoon salt

  • 4 tablespoons firm, cold vegan butter

  • 4-5 tablespoons iced water


A selection of wild mushrooms I found at the Boulder Farmer’s Market in mid August. The huge white lion’s mane in the upper left of this image added a rich chewy texture to the tart. That was complimented by chanterelles, the delicate yellow oyster, and the firm textured shiitakes. You can see that since they’d been refrigerated together in a brown paper bag for a few days before I got around to taking the photo and using them for the tart, bits had broken off of some of the more delicate mushrooms. But they were still super fresh, smelled sweet and tasted remarkable! Never use mushrooms that smell strongly or are beginning to get slimy.


Slices of tart may be stored in the refrigerator in an airtight container for up to 5 days. To reheat, place on a baking sheet and warm in a 375 degree F. oven or toaster oven. When warmed through, flip upside down and turn heat to broil. Return the tart to the oven to crisp the bottom crust if desired. Slices may also be frozen individually for up to 2 months.

Chilled GF pastry dough, ready to roll.

directions

  1. Prepare the pastry dough and chill for at least 2 hours.

  2. Clean the mushrooms thoroughly with a soft brush and set them aside. If mushrooms are very dirty, brush, then rinse very quickly under cold water. Shake off extra water and place on the counter, spaced well apart, on a clean kitchen towel to dry completely. Once dry, trim and discard any tough parts, then slice the mushrooms.

  3. Heat the oil in a large skillet over medium high heat until hot but not smoking. Add the shallots and toss to coat with oil. Reduce heat and cook, stirring frequently, until they begin to soften.

  4. Add the mushrooms, again increasing the flame and tossing the mushrooms to coat with oil, before turning down the heat.

  5. Add the garlic, lemon juice, nutmeg, salt, and pepper. Continue to cook, stirring often, until the mushrooms are very soft and most of the juice that is has disappeared.

  6. Stir in the chervil. Taste and adjust the seasonings. Set aside in a bowl.

  7. Roll the dough on a lightly floured countertop into a round that is approximately 1/4-inch thick. Transfer the dough to the tart pan (or use a pie plate). Trim extra dough from the top and pinch to fit the mold.

  8. Chill the raw tart until firm, at least 20 minutes. Meanwhile, preheat the oven to 350 degrees F.

  9. Pierce the bottom of the tart shell with with a fork. Line with parchment and weight down with dried beans. Bake on the bottom rack of the oven until the sides are very lightly browned. Remove the parchment and beans, then return the shell to bake for another 8 minutes, or until the bottom has just begun to color. Remove from the oven.

  10. Brush the inside of the tart shell with mustard.

  11. Mix the egg (or potato flour) into the mushroom mixture. Fill the tart shell and sprinkle cheese on top. Bake in the lower middle of the oven for about 30 minutes until the filling has firmed and cheese is melted.

  12. Remove from oven and cool briefly before removing the tart mold and slicing. Serve warm.

    NOTE: GF dough can be difficult to work with, depending on what mix you use. It is gluten in wheat flour that gives traditional pastry dough it’s texture and makes it easy to roll. Don’t fret if your dough tears while you’re transferring it to the mold. Just patch and pinch the new edges together. Then proceed as directed. Nobody will know!

For the Pastry Dough

  1. In a small mixing bowl, combine the GF flour with the salt.

  2. Cut the “butter” into small pieces, dropping them into the four.

  3. Working quickly and using your fingertips rub the flour and butter together until the mixture resembles dry oatmeal.

  4. Gradually stir in the cold water, until it forms a ball. Dust with flour, wrap in parchment and chill for at least 2 hours. May be frozen for up to 3 months.


Spaghetti Squash with Pesto and Butter Beans

Mary Taylor

Often I’ll prep various foods on the weekend with no particular dish in mind, but more to simply “stock the pantry” so that later in the week I can put together dinner in a flash. This recipe is one such dish that built itself from what was on hand. Vegan Pesto Sauce (store bought or use recipe that follows), baked spaghetti squash, and marinated butter beans combine for a lovely and balanced main course.

yield: 4-6 servings  |  prep time: 15 minutes (with components ready, longer if preparing all items from scratch)


ingredients

  • 1 medium spaghetti squash cooked and shredded

  • 1/2 orange bell pepper, shredded

  • 1 tablespoon olive oil

  • 1/3 cup vegan pesto (more to taste)

  • 1 1/4 cups marinated butter beans (recipe below)

    To Cook Squash

  • 1 scant tablespoon olive oil

  • Salt and pepper to taste

    Marinade for Butter Beans

  • 1 1/4 cup cooked butter beans

  • 2 tablespoons lemon juice

  • 1 1/2 tablespoons olive oil

  • 1 1/2 teaspoons honey or agave

  • Salt and pepper to taste

    Vegan Pesto (or use store bought)

  • 2 cups fresh basil leaves

  • 3-4 cloves garlic

  • 1/2 cup pine nuts

  • 1/4 cup mellow white miso

  • 2 tablespoons nutritional yeast

  • 1/4 cup olive oil

  • 2 tablespoons lemon juice

  • Salt and pepper to taste


Spaghetti squash (pictured center) is often overlooked. Yet it is versatile and makes a great “pantry item” to keep on hand. It has a delicate flavor that can compliment many sauces and, when baked for about 30 minutes, retains a lovely slightly crunchy texture that can be substituted for any type of noodle or pasta. Though, of course it will taste different from “true spaghetti” it is not only a great gluten free substitute, it opens up horizons you might have ignored thinking only rice or wheat noodles will work in your favorite recipe.


directions

To stock your pantry, prepare the vegan pesto (keeps up to 3 weeks refrigerated, 3 months if frozen), cook the squash (keeps 7 days refrigerated), and marinated butter beans (keep 5 days refrigerated) . Then, dinner is ready in 10 min!


Have all ingredients ready. If you have not shredded the squash, do so and keep it aside.

  1. In a small saucepan, warm the pesto briefly and in a separate pan warm the beans.

  2. In a large skillet, heat the 1 tablespoon olive oil until hot but not smoking. Add the bell pepper and toss to coat with oil. Cook, tossing frequently, for about a minute or until it begins to soften.

  3. Stir in the shredded spaghetti squash and toss for about a minute more to heat through. Season to taste with salt and pepper.

  4. On individual or one large serving plate arrange an arc of the warmed pesto. Place the squash along side this and nestle beans nest to the squash. Serve immediately.

For the Pesto

  1. Combine the basil, garlic, and nuts in a blender or food processor and puree until minced evenly. Add the miso and yeast and blend thoroughly.

  2. With the motor running pour in the oil and lemon juice and blend completely. Taste and adjust seasonings with salt and pepper.

For the Squash

  1. Heat oven to 350 F. Rinse the squash and cut it lengthwise, then scoop out and discard seeds.

  2. Brush the inside of each half with a very light brushing of olive oil and sprinkle with salt and pepper.

  3. Place cut side down on a parchment lined baking sheet. Pierce the skin of each half several times with a fork.

  4. Bake for 30 minutes, then remove from oven. When cool enough to handle, using a fork scoop out the squash, separating it into “spaghetti.”

For the Butter Beans

  1. Combine the beans with the lemon juice, olive oil, sweetener and salt and pepper. Allow to marinate for at least 30 minutes or up to several days, refrigerated.


Blackened Garlic Tofu with Sugar Snaps

Mary Taylor

This recipe is beautiful with a strong but subtle flavor and texture combination that is extraordinarily satisfying. It has a bit of prep, but all can be done well ahead of time, so when it comes time to cook the dish it’s quite easy. Blackened garlic’s rich flavor echos fresh garlic but gives a subtle depth to many dishes. It has higher concentrations than raw garlic of many nutrients and antioxidants which have shown to be helpful in reducing inflammation, improving brain health and reducing levels of triglycerides and cholesterol.

yield: 4-6 servings  |  prep time: 45 minutes


ingredients

  • 12 ounces extra firm tofu

  • 1 tablespoon sunflower oil (or any mild flavored oil with a high smoking point)

  • ½ teaspoon salt

  • ¼ teaspoon black pepper

  • 8-10 fermented blackened garlic

    (2 full tablespoons finely chopped, or use puree)

  • ¼ cup low sodium tamari

  • 2 ½ tablespoons maple syrup

  • 3-4 tablespoons water

  • ¼ cup minced scallions

  • 1/3-pound fresh sugar snaps

  • ¼ cup pickled ginger, minced

  • Pickling juice from ginger

  • 1-2 red jalapeno peppers, sliced thin (optional)


Blackened garlic has become a popular ingredient in many dishes these days. It is soft and chewy and has a delicately sweet garlic flavor. Available whole or in puree form online or in many stores.

You may make blackened garlic too, though it takes at least 16 - 21 days.

Select fresh, plump organic heads of garlic. Clean them thoroughly by scrubbing with a vegetable brush and removing all dirt. If the bulbs are very dirty, you may dry scrub, gently wipe with a damp kitchen towel and dry at room temperature for at least 24 hours before beginning to cook.

Place cleaned heads in a slow cooker or rice cooker. Find a well ventilated place, such as a porch or garage, to plug in the cooker where it can be undisturbed for a couple of weeks. Otherwise your whole house will smell like garlic!

Arrange the whole heads of garlic on the bottom of the cooker, with space between them. Place lid on cooker and set it on low. After a few days the skin of the garlic will begin to brown. After about 2 weeks the garlic will have darkened be quite hard. That is a good sign! Leave for an additional 2-4 days, checking for doneness. When ready they will have pulled away from the skin and softened beautifully. Remove from cooker and cool completely, then store in an airtight container until ready to use.


Individual cloves of blackened garlic are a wonderful addition to stir fry, sauces, pizzas, salads and virtually any savory dish.


directions

  1. Drain the tofu and cut into ½-inch thick slices. Arrange on a clean kitchen towel, cover with another towel and place a cutting board with heavy weight on top to drain the tofu for 30 minutes. Cut tofu into cubes.

  2. Meanwhile, combine the 2 blackened garlic, tamari, and maple syrup and water in a blender and mix into a paste. (If you use the puree, just combine garlic in a mixing bowl with other ingredients.) Set aside. The sauce may be prepared several days in advance and refrigerated, covered.

  3. Rinse the sugar snaps under cold water, then trim and discard the ends and tough stems.

  4. Slice the sugar snaps lengthwise into thin strips and steam over rapidly boiling water until they turn a bright green and are still crisp, 3-4 minutes.

  5. Immediately transfer the steamed sugar snaps to a strainer and place under cold running water until completely cool to preserve their bright color. Combine in a bowl with the pickled ginger and ginger juice to taste. Stir in sliced jalapenos if desired. May be steamed in advance, but add the ginger and juice just before serving to avoid discoloration.

  6. When ready to serve, have the sugar snaps at room temperature and arrange on individual or one large serving dish.

  7. Heat the oil over medium high heat in a large skillet. When hot, but not smoking, toss in the tofu. Season with salt and pepper and cook for a couple of minutes to begin to sear. Reduce heat slightly and continue to cook, tossing frequently, until the cubes are crisp and lightly browned. Transfer them to a clean bowl and set aside while finishing the recipe. It’s best to add the tofu to the sauce just before serving so it remains crisp on the outside and provides interesting contrast to the texture of the sugar snaps.

  8. Add the blackened garlic sauce to the skillet and allow it to bubble as you stir. Add the tofu. Warm through and coat with sauce. Stir in the scallions, saving some for garnish.

  9. Transfer the tofu to the serving dish and sprinkle with remaining scallions as a garnish. Serve immediately.

Winter’s Summer Tomato Soup

Mary Taylor

Mansing Li is not only an avid yoga practitioner he’s also a prolific gardener. During the summer huge boxes of fresh produce, flowers and honey from his garden sometimes appear on our doorstep along with out-of-this-world homemade tempeh and tofu. Between his generosity and green thumb I’ve learned a lot about food and cooking! Recently Mansing brought us a huge bag of tomatoes, fresh frozen at the end of last summer. This simple soup brought the rich flavor of summer into our house—when temperatures outside were dipping below zero. (Of course, you can make the same soup in the summer when tomatoes are at the peak.)

yield: 4-6 servings  |  prep time: 1 hour


ingredients

  • About 3 pounds frozen tomatoes

  • 1 sweet onion, diced

  • 8 cloves garlic, sliced

  • 2 tablespoons olive oil

  • Salt and black pepper to taste

  • 2-3 teaspoons honey

  • Red pepper flakes (optional)

  • 2/3 cup fresh basil or cilantro leaves, chopped


Nothing fancy. Rinse fresh sweet summer tomatoes well and allow them to dry at room temperature. Then pack them into a freezer bag or container and wait until you’ve forgotten how amazing fresh homegrown tomatoes can taste. Then use in this simple soup recipe and prepare to be amazed!


If you don’t have a food mill, and kitchen storage space allows, it’s worth getting one.

directions

  1. Empty the frozen tomatoes from their freezer container into a large bowl and thaw to room temperature. The tomatoes will soften and liquid from them will accumulate in the bowl.

  2. Using a food mill, puree the whole tomatoes into a second bowl, pouring the thawed liquid over them as you puree. Discard stem ends and skin from the tomatoes that remain in the mill.

  3. Heat the olive oil in a 3-4-quart heavy bottomed saucepan, placed over medium high heat. When the oil is hot, but not smoking, add the onions. Toss well to coat with oil, then reduce heat to medium low and continue to cook for about 8 minutes or until the translucent.

  4. Add the pureed tomatoes, garlic, 1 teaspoon salt and ¼ teaspoon pepper. Stir in 2-3 teaspoons honey.

  5. Bring the pureed mixture to to a boil, stirring frequently.

  6. Reduce heat and simmer and continue to cook until the soup has reduced to the desired thickness—thick is good here!

  7. Stir in the red pepper flakes and chopped fresh herbs. Taste and adjust the seasonings before serving piping hot.

Salty Spiced Hazelnut Chocolates

Mary Taylor

For Valentine’s Day—or any time, really—treat the ones you love to an elegant bite of chocolate! Hazelnuts wrapped in a layer of maple flavored almond paste are dipped in chocolate then topped with salt or red pepper flakes.

yield: 24 Chocolates  |  prep time: 45 minutes


ingredients

  • 24 hazelnuts

  • 2/3 cup almond meal

  • 3 tablespoons maple syrup

  • 1 teaspoon almond extract (optional)

  • 75-100 grams high quality dark chocolate

  • Kosher salt

  • Red pepper flakes


Any time of year these chocolates make a memorable gift to show your appreciation to someone you care about. The simple to make almond paste is so versatile and lasts a couple of weeks, so it’s likely to become one of your standard pantry ingredients as well.


directions

  1. Toast the hazelnuts in a preheated 325 degree F. oven until the centers are lightly browned, about 15 minutes. Immediately turn them out onto a clean kitchen towel, fold the towel to cover and rub the nuts vigorously to remove as much skin as possible. Set skinned nuts aside

  2. Toast more than the 24 you plan to use in this recipe. At least in our house toasted hazelnuts have a sneaky way of disappearing and those that remain keep well in an airtight jar.

  3. In a small mixing bowl, combine the almond meal, maple syrup and almond extract or water. Combine the mixture to a smooth paste. Prepared in advance, keeps refrigerated and airtight for 2 weeks.

  4. Flatten a teaspoon-sized piece of the almond paste and flatten into a round. Place a nut in the center and wrap almond paste around to cover. Roll between the palms of your hands to make a smooth, evenly shaped ball. Repeat with all the nuts.

  5. Break the chocolate into pieces and place them in the top of a double boiler over hot water. Using a rubber spatula, stir and fold the chocolate until it is a smooth even texture. Do not get water into the chocolate.

  6. Immediately remove from the heat and place over iced water, again stirring and folding the chocolate to cool quickly and thicken slightly. Once more place the chocolate over warm water and melt to an even texture. This step helps to prevent the chocolate from “blooming” or developing white blotches as it cools.

  7.  Quickly remove the chocolate from the heat and allow it to rest at room temperature, for about 3 minutes. Using a fork lower each hazelnut ball into the chocolate, rolling to coat evenly. Lift out of the chocolate, resting chocolate on the fork over the bowl for a moment to allow extra chocolate to drip into the bowl.

  8.  Place coated hazelnut balls on wax paper. Sprinkle kosher salt or red pepper flakes (or both) on top of the chocolates. Immediately place in the refrigerator to harden the chocolate coating. Serve cold or at room temperature. Will keep for a week if refrigerated. Theoretically.

Mysore Style Beet Palya

Mary Taylor

Beets are one of those humble superfoods that go unnoticed amongst many food fashion trends, but are nutritionally powerful, full of Vitamin C, potassium, manganese as well as folate. They're a staple in South India which serves as inspiration for this dry stir fry--a Palya. The dish goes well with Western and Indian meals and you can add the chopped beet tops for more variety in texture and added nutritional value.

yield: 4 servings | prep time: 15 minutes | cooking time: 15 minutes


ingredients:

  • 1 pound beetroot

  • 2 teaspoons urad dal (split peeled mung beans)

  • Water

  • 1 tablespoon coconut or vegetable oil

  • 1 teaspoon black mustard seeds

  • 1 teaspoon cumin seeds

  • One pinch of teaspoon hing (asafoetida)

  • 1/4 teaspoon ground turmeric

  • 1 dried red chili

  • 1/2 teaspoon salt or to taste

  • 1/3 cup fresh or frozen grated coconut

directions: 

  1. Rinse the urad dal. Place in a small dish and cover with water for a few minutes while preparing the rest of the ingredients.

  2. Trim tops from beets and either chop to use in this recipe or set aside for another use. Rinse the beets well and peel, then cut into small cubes. You should have about 4 cups of beets.

  3. In a 12-inch skillet, heat the oil over medium flame until hot, but not smoking. Stir in the mustard and cumin seeds then cook, stirring often, until mustard seeds have darkened and begin to pop. Add the drained urad dal, hing, turmeric and chili. Cook briefly to darken the chili.

  4. Add the beets and salt to the pan and toss well. Cook, stirring often, for about 2 minutes, then reduce the heat to medium low, add enough water to come about 1/8 of the way up the beets. Stir in the coconut and cover.

  5. Continue to cook until the beets are tender, About 15 minutes, stirring often to prevent sticking and adding more water if needed. Turn into a serving dish when all water has evaporated and beets are tender. Serve piping hot.

Sprouted Lentil and Heirloom Tomato Salad

Mary Taylor

tomatoes 2.jpg

This surprising combination of flavors, sweet, pungent and spicy gives this dish it's memorable appeal.

yield: 6 servings  |  prep time: 40 minutes  |  cooking time: 15 minutes


ingredients

  • 2 1/2 cups cooked black beans

  • 2 1/2 tablespoons olive oil

  • 1/2 cup sweet onion, sliced thin

  • 4 cloves garlic

  • 1 small red bell pepper, diced

  • 2 teaspoons cumin

  • 1 teaspoon oregano

  • 1/2 cup vegetable stock

  • Salt and pepper to taste

  • 1/4 cup minced cilantro

  • 3 dried ancho chili peppers

  • 3/4 cup diced tomatoes (may use drained canned tomatoes)

  • 2 tablespoons tomato paste

  • 2 teaspoons smoked paprika

  • 1 tablespoon honey

  • 2 bananas

  • 1 tablespoons butter or coconut oil

  • Butter lettuce leaves, cooked rice and cilantro for garnish

directions

  1. Drain the beans and set aside.

  2. Heat 1 1/2 tablespoons oil in a skillet over medium heat until hot but not smoking. Add the onion and toss to coat with oil, then reduce heat to low and cook, stirring frequently until translucent.

  3. Slice two cloves of garlic very thin. Add along with the bell pepper, cumin and oregano to the beans.

  4. Stir in 1/4 cup stock. Bring the mixture to a simmer and cook, stirring often, until flavors merge and the peppers just begin to soften, about 8 minutes.

  5. Stir in the chopped cilantro. Season to taste with salt and pepper. The beans may be prepared to this point and refrigerated in an airtight container for up to 4 days.

  6. To prepare the sauce: Place the ancho peppers in a small bowl and cover with boiling water. Set aside and allow to soften for 20 minutes.

  7. Drain the peppers. Remove stems, and most of the seeds. Place anchos in a food processor or blender with the remaining garlic, 1 tablespoon oil, 1/4 cup stock, diced tomatoes, tomato paste, paprika and honey. Blend well.

  8. Warm the sauce, seasoning to taste with salt and pepper. The sauce may be prepared up to a week in advance if refrigerated in an airtight container.

  9. To serve: Warm the beans and the ancho sauce separately.

  10. Peel and slice the bananas into 4-inch wedges. In a skillet heat the butter or coconut oil until very hot, but not smoking.. Carefully place banana slices cut side down in the hot oil. Cook until lightly browned.

  11. To serve arrange the beans, rice and bananas on top of a lettuce leaf. Garnish with cilantro and a dollop of ancho sauce. Serve additional sauce along side.

Raw Autumn Tart

Mary Taylor

The rich flavor of a hazelnut crust provides a strong yet subtle background taste to the apple puree that serves as a base for this raw tart. It’s then balance by any variety of autumn fruit you choose to place on top.

yield: 6-8 servings  |  prep time: 1 hour


ingredients

  • 2 cups hazelnuts

  • 1 1/4 cup Medjool dates

  • Pinch of cayenne

  • 3 tart apples

  • 1/4 cup dried apple slices

  • 1/4 cup raisins

  • 1 tablespoon lemon juice

  • 1 banana

  • 1 fuyu persimmon, sliced thin

  • Mixed seasonal berries

  • 3 tablespoons apricot jam, melted and strained


You might think of persimmons as a fruit that must only be eaten when it is fully ripened. That’s when the flesh develops a soft, pudding-like texture that has a super sweet almost ambrosial quality to it.

There is nothing quite like the taste of a scoop of fully ripe persimmon! Hachiya persimmons—the variety most commonly found in most US markets and many other varieties contain a high amount of tannin. This makes them heavenly when ripe and memorably astringent, bitter and unpleasant when not.

But you’re likely to find fuyu persimmons in good markets these days as well. They can be ripened until soft, but because they contain less tannin they may also be eaten, skin and all, like an apple. Less ripe fuyu persimmons are still incredibly sweet and flavorful, but with a crisp inviting texture that compliments the berries and puree in this raw tart recipe.

Thank you to our friend and fellow teacher, Mojdeh Zahiraleslamf, or sharing from her garden the beautiful fuyu persimmons pictured above.


The hachiya persimmon is eaten soft only.

directions

  1. Preheat the oven to 325 degrees F. Place the hazelnuts on a baking sheet and toast, turning a few times, for about 15 minutes or until lightly browned inside.

  2. Immediately transfer to a clean kitchen towel, folding the towel over the nuts and rubbing thoroughly to remove as much skin as possible.

  3. Discard the skin nad transfer the nuts to a food processor fitted with the chopping blade.

  4. Meanwhile, remove pits from dates and chop them into small pieces. Place them in a small mixing bowl and pour boiling water over to soften

  5. In separate bowls, soak the dried apples and raisins, allowing all the dried fruit to soften for about 15 minutes.

  6. Drain the dried fruit, squeezing out most of the water. Add about 2/3 of the dates to the hazelnuts along with the cayenne. Process until evenly ground to a medium texture. Press this nut mixture into one large or two smaller pie plates. The crust may be prepared up to 24 hours in advance.

  7. Peel, core and chop the fresh apples. Place them in the food processor along with the remaining medjools, drained dried apples, and raisins. Add the lemon juice and banana, reserving about 2-inches of the banana to use as topping for the tart if desired.

  8. Process until evenly mixed and smooth. Transfer to the pie plate and arrange fresh fruit on top. Glaze the fruit with a brushing of warmed appricot jam. Cover and refrigerate until ready to serve.

Miso Noodle Soup

Mary Taylor

As the days begin to shorten my feelings are mixed. I’m attached to the ease of summer with its seemingly limitless supply of juicy fresh fruit and flavorful vegetables and always something new to experiment with in the kitchen. But there’s something to be said for colder days too. Frost on the windshield and the stunning beauty of the glint of sunlight on freshly fallen snow reminds me of how cozy and safe it can feel in the winter—especially when you’ve got a steaming bowl of soup in hand. This Miso Noodle Soup is easy and fast to prepare and can seem totally different time to time, according to vegetables and spices you have on hand.

yield: 4- servings  |  prep time (while cooking): 25 minute  


ingredients

  • 9 cups light vegetable stock or water

  • 1 small piece kombu

  • 1 tablespoon minced ginger

  • 3 cloves garlic, sliced thin

  • 1 bundle organic Soba or Udon noodles

  • 1 cup mushrooms, sliced

  • 1 tablespoon light tamari

  • 1 teaspoon rice vinegar

  • 2 teaspoons toasted sesame oil (optional)

  • 2 carrots, sliced thin

  • 3 cups broccoli florets

  • 1 cup snap peas

  • 10-12 very thin slices daikon radish

  • ¼ cup sliced water chestnuts

  • 4 tablespoons white miso paste

  • 1 ½ tablespoons red miso paste

  • ¼ cup minced scallions

directions

  1. In a 2-quart saucepan, simmer the stock along with the kombu, ginger, garlic, and mushrooms as you prepare the vegetables and noodles.

  2. In a separate saucepan, cook the noodles in boiling water until just tender, then immediately drain, running cold water over the noodles to stop their cooking. Transfer to a bowl and toss to coat with the tamari, vinegar, and optional sesame oil. Cover and set aside.

  3. Trim the vegetables and place them on a try to add to the soup when ready.

  4. To finish cooking the soup, bring the broth to a medium boil. Add the vegetables individually, according to how quickly they will cook. In this case, they are listed in the order they should be added to all cook evenly.

  5. Remove the soup from the heat and stir enough soup liquid into the miso to make it pourable. Stir this along with the noodles into the soup.

  6. Sprinkle the scallions on top and serve immediately.


* Garnishes to serve alongside include, pickled ginger, Srirancha sauce, extra miso paste, tamari, or teriyaki sauce.

Asian Pears with Baby Greens

Mary Taylor

Asian Pears_2.jpg

These stunning Asian Pears were a gift from our friend Mansing who’s mastered the art of growing all sorts of unusual vegetables in this crazy Colorado climate. Mansing, thank you so much for bringing life into our kitchen! Asian Pears are crisp and juicy with an ambrosial quality to their delicate flavor. They are delightful sliced and eaten as a snack, but also are a worthy addition to almost any green salad. They’re complimented here with candied nuts, olives, vegan feta cheese and a light ginger dressing.

yield: 4- servings  |  prep time: 25 minute  


ingredients

  • 5 cups mixed baby greens, washed

  • 1 beet, peeled and grated

  • 3 small Asian Pears (or one large)

  • 1/2 cup candied nuts*

  • 1/3 cup crumbled feta (vegan or not)

  • 10 green olives, sliced

  • 1 1/2 tablespoons rice vinegar

  • 4 tablespoons olive oil

  • 2 teaspoons finely minced ginger

  • 1 teaspoon honey or agave

  • Salt and pepper to taste

  • Toasted sesame oil (optional)

directions

  1. Arrange the greens, beets, pears, nuts, feta and olives on individual or one large serving plate.

  2. In a small bowl, whisk together the rice vinegar, olive oil, ginger, sweetener, salt and pepper.

  3. Toss salad with dressing just before serving or serve alongside for guests to add as desired.

  4. For an optional flavor boost, sprinkle just a couple of drops of toasted sesame oil on the salad before eating.


Asian Pear Salad.png

* See a recipe for maple walnuts in our Mint Scented Celery Salad recipe. For crisper nuts, omit the butter in this recipe, but cook otherwise as directed.

Fresh Grilled Shishito Peppers

Mary Taylor

Peppers 4.jpg

Shishito peppers have become a fashionable appetizer at tapas bars and upscale Spanish and Mexican restaurants. The dormant gambler within us might be what’s driving the attraction to this simple dish—wondering if we’ll get the “one in ten” that is super hot. Or maybe it’s because they’re just so good and seem to compliment pretty much any meal they’re part of. Regardless, they’re super easy to make at home and though they’re best served hot off the grill, they are pretty amazing chilled as leftovers as well.

yield: 4- servings  |  prep time: 2 minute  |  cooking time: 8 minutes


ingredients

  • 1 quart fresh Shishito Peppers

    (about 4 cups)

  • 2 teaspoons olive or coconut oil

  • 1 1/2 tablespoons lemon juice

  • 1 teaspoon lemon zest

  • 1/4-1/2 teaspoon Kosher salt

directions

  1. Place the peppers in a colander and rinse well under cold running water. Allow to drain for a few minutes.

  2. Heat a medium sized skillet for about 30 seconds over high heat. Add the oil, tilting the pan to coat evenly.

  3. Add the peppers to the skillet and toss to coat with oil. Allow the peppers to begin to change color, then reduce heat to medium high.

  4. Stir in the lemon juice, zest and salt. Cook , tossing frequently, until peppers are tender and evenly blistered.

  5. Turn out onto a platter and serve immediately.

Fresh Peach Pecan Pie

Mary Taylor

Fresh Peach Pecan Pie.jpg

Here in Colorado in late summer, peaches are plentiful and bursting with flavor. This year our long-time friend, Cindy, gave us a huge bag of fruit from her tree so besides just eating them plain I made salsa (which I forgot to photograph), and an amazingly simple raw peach pie.

yield: 6- servings  |  prep time: 45 minutes  |  resting time: 15 minutes


ingredients

  • 2 cups pecans

  • 1/2 cup Medjool dates

  • 1/2 cup boiling water

  • 6-8 perfectly ripe peaches

  • 1/3 cup minced fresh mint

directions

  1. Preheat the oven to 325 degrees F. Place the pecans on a baking sheet and toast, turning a few times, for about 15 minutes or until lightly browned inside.

  2. Transfer to food processor fitted with the chopping blade.

  3. Meanwhile, remove pits from dates and chop them into small pieces. Place them in a small mixing bowl and pour boiling water over to soften for 5-10 minutes.

  4. Drain the dates, squeezing out most of the water, then add to the pecans.

  5. Process this mixture, using the pulse function, until it is an even medium texture. Press the nut mixture into a pie plate. The crust may be prepared up to 24 hours in advance.

  6. Peel and slice the peaches. Sprinkle fresh mint on the pie crust and arrange sliced peaches on top. Garnish with a sprig of mint.

  7. Cover and refrigerate until ready to serve. Best eaten within a few hours so peaches remain plump and glossy. Though it is really tasty a day or so later as well!

Sweet and Spicy Bean Medley

Mary Taylor

Summer Bean Salad 1.jpg

The complimenting textures and flavors of this colorful summer salad make the dish a satisfying main course or snack. It’s best to prepare ahead and toss for flavors to marry. You may refrigerate the salad for up to 3 days (though colors will fade), but bring toward room temperature before serving ever so slightly chilled with corn tortillas or crusty bread alongside.

yield: 4-6 servings  |  prep time: 25 minutes  |  resting time: 15 minutes


ingredients

  • 1 cup cut green beans

  • 2 small cucumbers, peeled, seeded and sliced

  • 1 ½ cups cooked black beans

  • 1 stalk celery, peeled and diced

  • 1/3 cup cherry tomatoes, halved

  • 1 ear corn, cooked and cut from cob

  • 2 tablespoons fresh lime juice

  • 2 cloves garlic, minced

  • 2 teaspoons agave

  • 1 teaspoon ground cumin

  • ½ teaspoon dried oregano

  • 1 tablespoon chili powder

  • 4 tablespoons olive oil

  • Salt to taste

directions

  1. Steam the green beans over rapidly boiling water until just tender, 6-8 minutes.

  2. Immediately transfer to a strainer and rinse under very cold water to stop the cooking and stabilize the bright green color. Pat dry and transfer to a large mixing bowl.

  3. Put the sliced cucumbers in the strainer and sprinkle with salt. Allow them to rest for 10 minutes while preparing the rest of the salad. (This removes any bitterness).

  4. Add the black beans, celery, cherry tomatoes and corn to the mixing bowl along with green beans.

  5. In a small mixing bowl, whisk together the lime juice and remaining ingredients.

  6. Pat the cucumbers dry (do not rinse) and add them to the salad then pour the lime dressing over and mix well.

  7. Allow salad to rest for 15 minutes, tossing occasionally, or cover and refrigerate until ready to serve.

Chipotle Grilled Corn Medallions

Mary Taylor

Super simple, tasty and a very interesting way to serve corn on the cob. This recipe was inspired by corn served at Menla Mountain Retreat for dinner one evening this year during the “Yogis and the Buddha” retreat. I’ve recommended brushing the “medallions” with spicy chipotle butter, but just plain, unadorned medallions can be very tasty as well.

yield: 8-12 servings  |  prep time: 15 minutes  |  cooking time: 12 minutes


ingredients

  • 6 ears corn, husked

  • 2 tablespoons tamari

  • 2 tablespoons mirin

  • 2 teaspoons lime juice

  • 4 tablespoons minced cilantro

  • 4 tablespoons butter, oil or coconut butter

  • ½ teaspoon salt (or to taste)

  • Powdered dried chipotle for dusting

directions

  1. Preheat the oven to 450° F.

  2. Cut the corn into ½-inch thick rounds and transfer to a shallow baking dish.

  3. Combine the tamari, mirin, lime juice, cilantro, butter and salt in a small mixing bowl. Pour this mixture over the corn then turn the rounds of corn to coat evenly with the tamari mixture. Sprinkle a light dusting of chipotle powder over the medallions. The medallions may be prepared up to 3 hours in advance to this point if covered and refrigerated.

  4. Place the corn in the preheated oven and cook until piping hot and lightly browned. Serve immediately.